Hi all!
I have a .vti image that was converted from a .vtu file using python.
In the Paraview application, when reading this image, taking into account the following parameters:
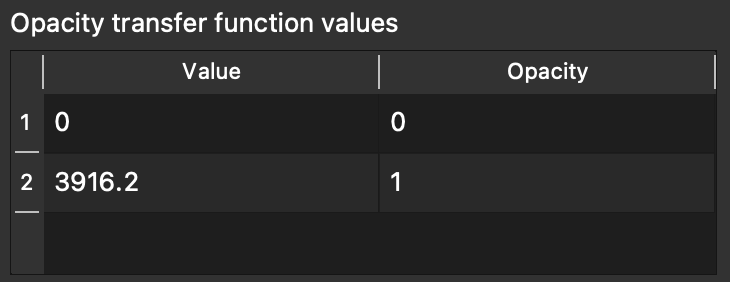
I can read the image and get a blue cube, provided that the standard value of the opacity transfer function is equal to the following:
If I change the value of the first point to 0, then the image shell (cube) disappears and I can see the image itself:
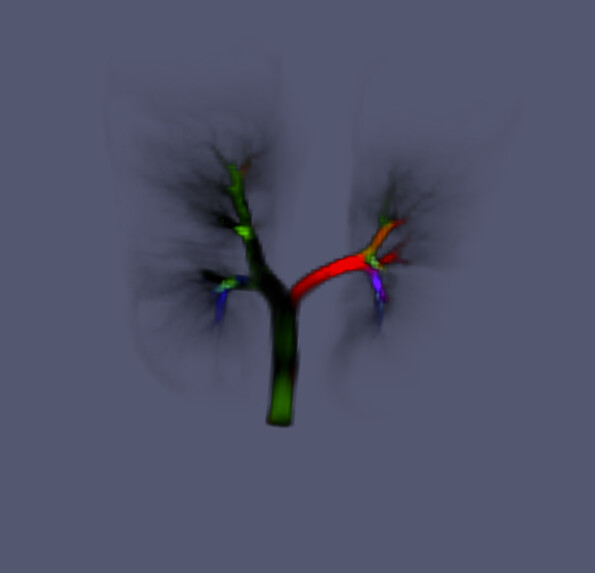
So, my goal is to make the cube shell invisible and get a result that is similar to the screenshot above using only the vtk.js capabilities.
In addition to the standard receiving and reading an image operation using vtkXMLImageDataReader, vtkVolume, vtkVolumeMapper and so on, I also added the following code:
const source = reader.getOutputData()
source.getPointData().setActiveScalars('velocity [m/s]')
source.getPointData().setActiveVectors('velocity [m/s]')

const ofun = vtkPiecewiseFunction.newInstance()
ofun.addPoint(0, 0)
ofun.addPoint(3916.2, 1)
actor.getProperty().setScalarOpacity(0, ofun)
I get an image, namely a cube, but I was not able to get rid of the outer shell of the cube and see its inside with this code. Taking into account the fact that I tried to do such an experiment with classic .vti images (which were not converted from .vtu) and everything was successful.
What could be wrong? What needs to be added or removed?
Thanks in advance for your answers!
Hello,
Do you have gradient opacity enabled?
actor.getProperty().setUseGradientOpacity(0, true);
Also does the bounding box of the volume disappear if you add a transparent opacity point at 1500?
ofun.addPoint(1500, 0)
Thank you for your reply!
After entering this line of code, unfortunately nothing has changed:
Adding a new point with 0 opacity also did not bring any visible changes:
The volume mapper accesses your data by doing:
const scalars = image.getPointData() && image.getPointData().getScalars();
What is scalars when doing:
const scalars = source.getPointData().getScalars();
You can also make sure that the range is what you expect by doing:
scalars.getRange();
Scalars are equal to an object with the following methods:
As for the range, the result is the same as in Paraview, namely [0, 3916.2019995919436].
Can you share the dataset so that I can reproduce the issue ?
I managed to get a minimal example working:
// Load the rendering pieces we want to use (for both WebGL and WebGPU)
import '@kitware/vtk.js/Rendering/Profiles/Volume';
import vtkFullScreenRenderWindow from '@kitware/vtk.js/Rendering/Misc/FullScreenRenderWindow';
import vtkPiecewiseFunction from '@kitware/vtk.js/Common/DataModel/PiecewiseFunction';
import vtkVolume from '@kitware/vtk.js/Rendering/Core/Volume';
import vtkVolumeMapper from '@kitware/vtk.js/Rendering/Core/VolumeMapper';
import vtkXMLImageDataReader from '@kitware/vtk.js/IO/XML/XMLImageDataReader';
import HttpDataAccessHelper from '@kitware/vtk.js/IO/Core/DataAccessHelper/HttpDataAccessHelper';
const fullScreenRenderer = vtkFullScreenRenderWindow.newInstance({
background: [0.32, 0.34, 0.43],
});
const renderer = fullScreenRenderer.getRenderer();
const renderWindow = fullScreenRenderer.getRenderWindow();
const actor = vtkVolume.newInstance();
const mapper = vtkVolumeMapper.newInstance();
actor.setMapper(mapper);
const ofun = vtkPiecewiseFunction.newInstance();
ofun.addPoint(0, 0);
ofun.addPoint(3916.2, 1);
actor.getProperty().setScalarOpacity(0, ofun);
actor.getProperty().setInterpolationTypeToLinear();
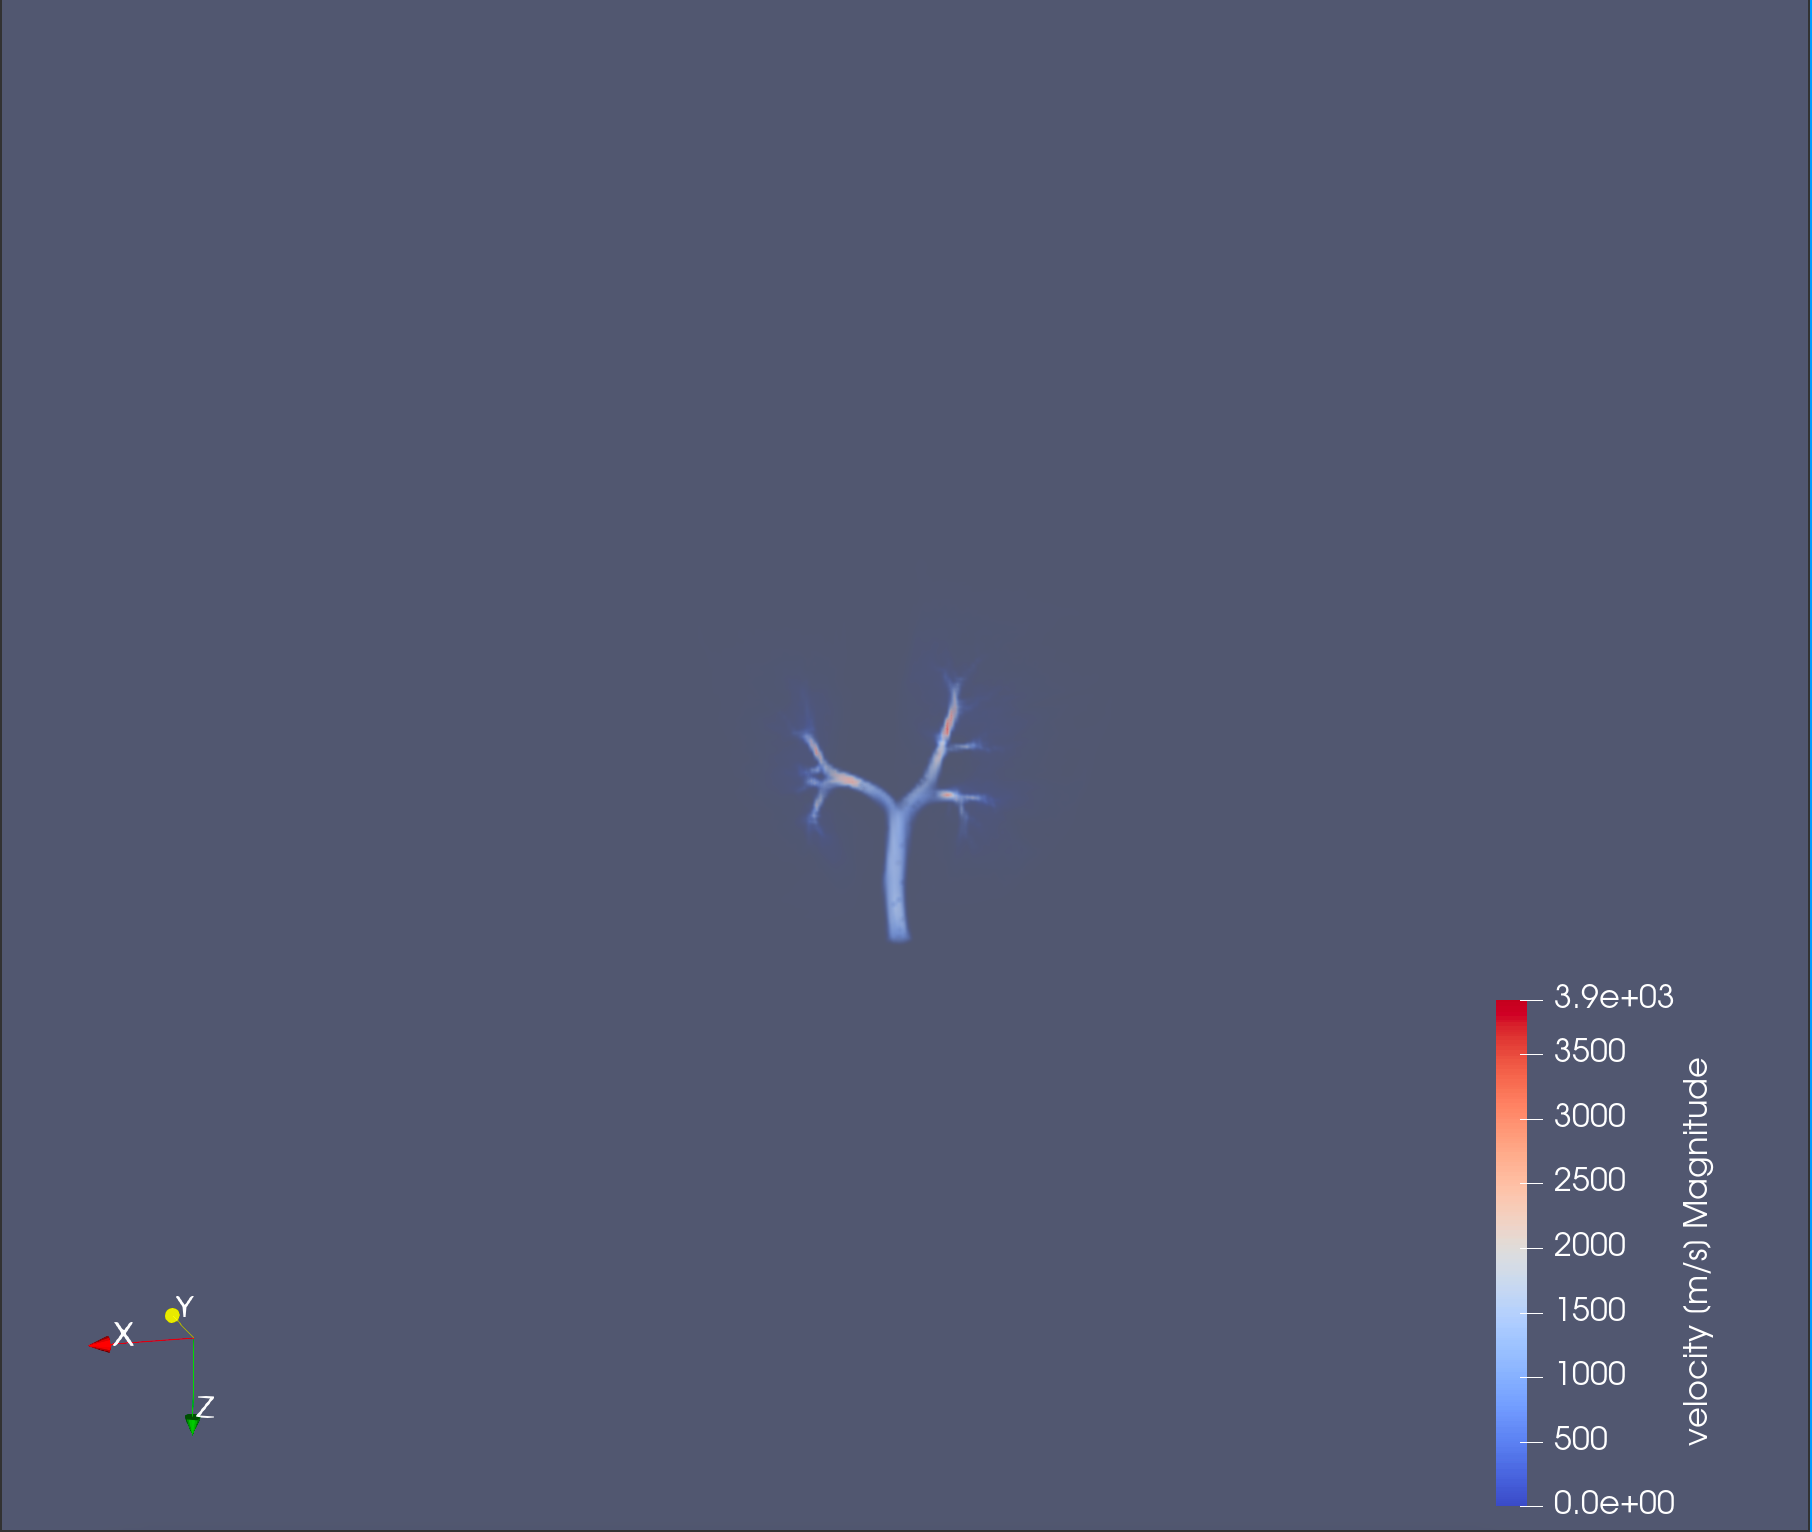
actor.getProperty().setIndependentComponents(false);
renderer.addVolume(actor);
HttpDataAccessHelper.fetchBinary(
`${__BASE_PATH__}/data/volume/functional.vti`
).then((fileContents) => {
const reader2 = vtkXMLImageDataReader.newInstance();
reader2.parseAsArrayBuffer(fileContents);
const imageData = reader2.getOutputData();
imageData.getPointData().setActiveScalars('velocity [m/s]');
mapper.setInputData(imageData);
const interactor = renderWindow.getInteractor();
interactor.setDesiredUpdateRate(15.0);
renderer.resetCamera();
renderWindow.render();
});
If you want to use independent components, you will need to give a color transfer function and an opacity function for each of the three components. I think that actor.getProperty().setIndependentComponents(false); is the line that was missing to get a visualisation.
This is the result that I get with the code above:
There are three ways of changing the result:
- Using dependent components: the three components will be interpreted as RGB channels, and you can provide an opacity function that will use the length of the vector (which corresponds to the velocity in your case)
- Using independent components: you will need to provide a color transfer function and an opacity function for each component
- Using
actor.getProperty().setColorMixPreset(ColorMixPreset.CUSTOM); and using custom GLSL code to do your own mix. It will use independent component and you can take a look at this file Sources\Rendering\Core\VolumeMapper\test\testColorMix.js and the documentation for setColorMixPreset to understand how it works
Thanks a lot! Indeed, I just needed to add actor.getProperty().setIndependentComponents(false) to my code and it turned out to be the solution.