Inverted perspective divide in VTK

Hello everybody,

With vtkCamera, we can use perspective projection and orthographic projection. As I understand it -when using perpective projection- a 4x4 projection matrix is set up which copies the z-values into the w component of the [x, y, z, w] homogeneous coordinates. Downstream, on the graphics hardware, this w component is used to perform the ‘perspective divide’ that makes objects farther away from the camera appear smaller by dividing x and y values by w. When using orthographic projection, this divide does not happen.

I am currently trying to achieve the opposite of a perspective divide. Namely, that objects that are farther away from the camera appear larger. This is to simulate a projection through poly data towards the near plane in front of the camera (see figure).

When I started, it seemed almost too easy. But as far as I can see, this is not possible using vtkCamera. I’ve tried torturing the camera projection matrix in many ways, but it seems to be impossible due to the way 3D graphics pipelines are designed … Does anyone know an alternative or ‘correct’ way using VTK?

I don’t think it is a simple perspective divide that you’re looking for. You want to switch the frustum to a reverse or Byzantine frustum. This is far harder to achieve with the OpenGL view frustum.

If you do end up computing the projection matrix yourself, vtkCamera allows using externally provided projection matrix directly. See vtkCamera::SetExplicitProjectionTransformMatrix and vtkCamera::SetUseExplicitProjectionTransformMatrix

If you want to do a DRR or a MIP, then the solution is easy: just place the VTK camera at the position of the X ray source, looking towards the X ray detector. People do this all the time, and it doesn’t require a special matrix. The only times when this doesn’t work is when you have to deal with occlusion, in which case you’d have to reverse the depth buffer checks.

You may want to switch between normal and reverse perspective. For example when you render left atrium as an image overlay on fluroscopy images then you want to be able to render the front and the back surface of the atrium. Rendering the back side is easy with the regular camera, but to render the front surface (that is closer to the X-ray source) you need reverse perspective.

The good news is that you can very easily achieve reverse perspective in VTK: you just need to invert the sign of a single value in the the projection matrix (as I remember it was the bottom-right value, but maybe it was the one above it). vtkCamera does not have an API for this, but you can modify or subclass it and add the reverse perspective option.

I have implemented this in VTK many years ago and it worked perfectly for both surface and volume rendering. If you find that this technique works well then it would be nice if you could submit a merge request that adds reverse perspective option to vtkCamera, as this is a basic need for all 3D fluroscopy overlay applications.

Dear repliers, thank you for taking the time to help me.

@ Sankesh:
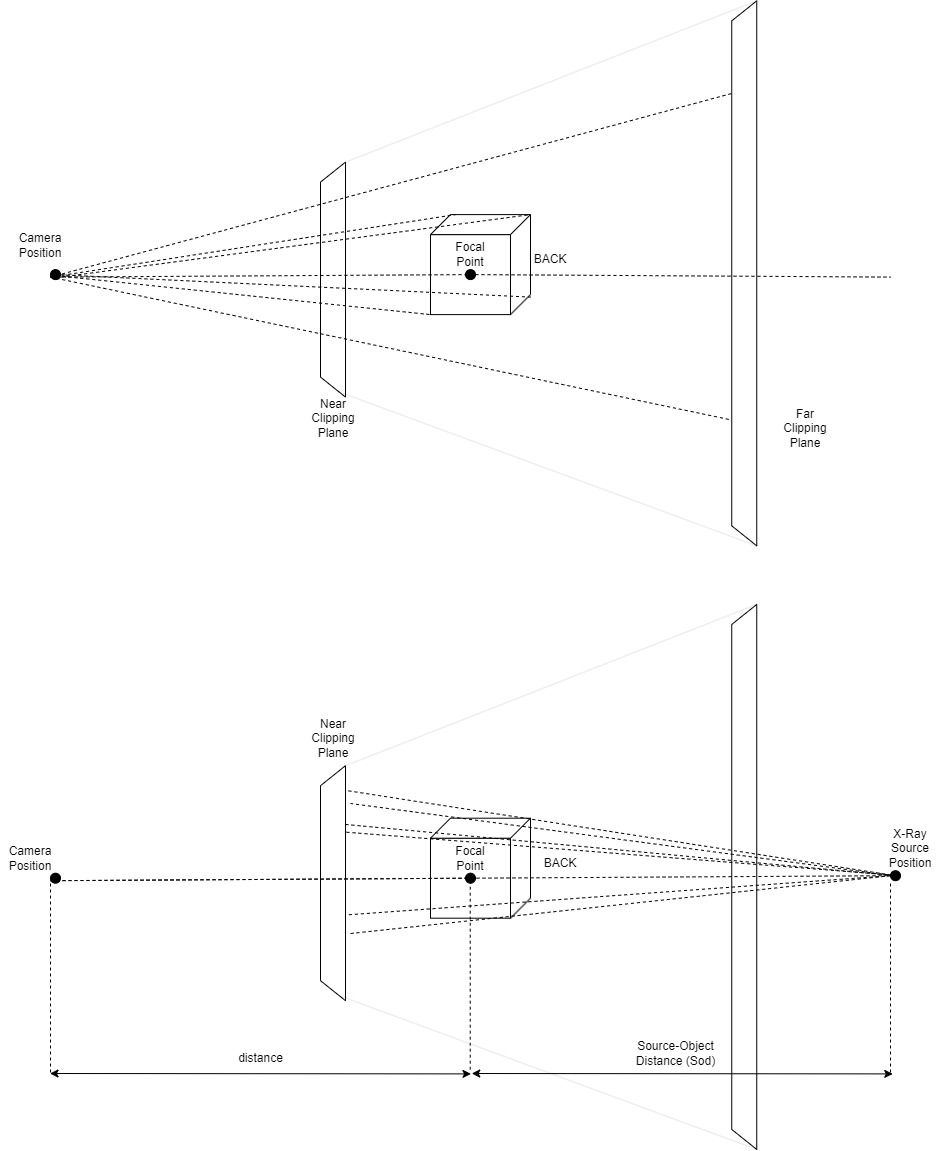
Thanks for your reply. Setting the explicit projection transform matrix is exactly what what I’ve been trying up until now. I am able to set it and it has an effect on the projection. However, the devil is in the details of coming up with the right contents of the projection transform matrix. I am afraid this is because vtk uses openGL, DirectX or some other hardware interfacing implementation to perform the perspective divide, but I am not yet sure.

@David:
Thanks for your suggestions. Reversing the camera would solve the projection problem, but it would also flip our polydata and it would place the vertices in the back in front of those in the back. I looked around, but I could not find a way to reverse the depth buffer checks. If you have solved this problem in the past, I would be very curious about the actual implementation.

@Andras:
Thank you for your reply. I am not quite sure if I understand what you mean by rendering the front and back surfaces differently. If I understand correctly, I would expect that all vertices are projected using the same projection matrix?

I tried inverting the sign of the value(s) in the projection matrix, like you suggested, but unfortunately this does not work. Is this the value copying the z-value into the w-component?

if we have a matrix
0,0 0,1 0,2 0,3
1,0 1,1 1,2 1,3
2,0 2,1 2,2 2,3
3,0 3,1 3,2 3,3

I tried flipping the sign of 2,2 2,3 and 3,2 separately.

Below are the printed vtkCamera matrices from a standard perspective projection matrix and an parallel/orthographic projection matrix, with identical position, view up and focal point:

standard:
2.09928 0 0 0
0 3.73205 0 0
0 0 -1.91509 -1
0 0 -468.303 0

parallel:
0.00688308 0 0 0
0 0.0122366 0 0
0 0 -0.00569628 0
0 0 -1.91509 1

Looking at these I would expect that value 2,3 is the z-to-w component copy value. Based on my (obviously) basic linear algebra knowledge and these sources:

https://www.scratchapixel.com/lessons/3d-basic-rendering/perspective-and-orthographic-projection-matrix/opengl-perspective-projection-matrix.html
I suspect that he actual perspective divide is happening on the shader. I also suspect that what I try to achieve requires a perspective multiply

Regarding depth check reversal, I have no practical experience, but in OpenGL it’s done by using glDepthFunc(GL_GEQUAL) instead of glDepthFunc(GL_LEQUAL). The latter is hard-coded into VTK.

I’ve tested this and you can get the correct reverse perspective by inverting the sign of the third column of the perspective projection matrix:

Surface rendering

Normal perspective:

Reverse perspective:

Volume rendering

It also works for CPU volume rendering (unfortunately, ray computation seem to be implemented with some custom logic in the GPU volume renderer, so that would need some fixes).

Normal perspective:

Reverse perspective:

Implementation

This is the change that would be needed in vtkCamera:

I used this change in 3D Slicer to create the screenshots above like this:

threeDViewNode = slicer.app.layoutManager().threeDWidget(0).threeDView().mrmlViewNode()
cameraNode = slicer.modules.cameras.logic().GetViewActiveCameraNode(threeDViewNode)
cameraNode.GetCamera().SetReversePerspective(True)

You could clone the perspective matrix computation in your code, insert the column sign inversion there, and set the matrix explicitly, which would require more code to maintain but then you would not need to modify VTK.

1 Like

Hi Andras,

Thank you for your time and effort looking into this.

Although your solution is of course a very useful addition, this is not exactly what we aim to achieve. We overlay our 3D rendered meshes on top of a X-Ray fluoroscopy image in the background. For us, it is important that objects that are in front of objects in the back remain in front. When looking at your examples, this would mean that the shoulder blades remain in the back while the ribs remain in the front. We only require the x-/y-positions of the cells to be projected onto the near view plane as if they were projected from a point source on the back of the patient (inverted perspective divide).

It might be that this is not the best solution to our problem and that we are better off using a parallel projection and a transform filter on our actors or some similar alternative. However, every route I tried so far had its issues, so I got the impression I was not using VTK as it was intended.

This is exactly what I described in my previous post.

Note that if you want the spine to appear on top then you don’t need to use reverse perspective. However, most commonly in vascular applications the X-ray source is under the table and the patient lies on the table in supine position, therefore clinicians usually prefer to see the ribs appear on top. To show the ribs on top with correct projection you need the reverse perspective.

For spinal applications (pedicle screw placement, facet joint injections, etc.) you want the spine appear on top but then the patient is in prone position, so again, you need reverse perspective.

For electrophysiology applications, the clinician may want to see the anterior or posterior wall of the left atrium, so you need quick switch between normal and reverse perspective.

Looking at the pictures in your post this is not exactly what we are trying to achieve.

In our case, the C-Arm of the fluoroscopy device moves to different angles around the patient during a catheterization procedure, with the source below the patient and the detector plate above. We want to see our heart-model polydata as it would appear looking from behind the C-Arm’s detector plane, towards the source. We overlay our model on top of the flouroscopy video stream. The clinician can request to make specific parts and data types included in our model (in-)visible, while maintaining the same angulation. They want to see the parts on the front side of our 3D model in front of the parts in the back of our 3D model. But with the parts in the back scaled larger because they are closer to the X-Ray source and the parts in the front scaled smaller.

This is an example of our rendering with the default perspective that we would like to change (parts closer to the camera appear larger):

It might be that I was not using the correct terminology. I am sorry if I was unclear, I did not mean to waste anybody’s time.

If you display such highly transparent surface then the perspective does not even matter. You can place the camera in the X-ray source position, set up the camera parameters to match the X-ray projection parameters and you are done. Everything appears in the rendering, there is nothing in front or behind. Of course you need to put the fluoro image farther from the camera if you rely on the renderer’s alpha blending to fuse the images (but most likely you want to have a bit more sophisticated image fusion algorithm than just alpha blending).

Reverse perspective is only needed if you want occlusion within the rendered 3D model. For example, instead of showing the entire left ventricle, you may want to show only one side to make it easier to understand the 3D shape.

I already tried placing the camera in the source position, but this flips left and right side of the model. Unfortunately, I could not find a method in VTK to left-right flip the renderer’s output (window) to make up for this.

We normally optimize the surface opacity, based on the combination of the surface colors and the grayscale intensities in the background, so the opacity may vary. We use two separate layered renderers: one for the background image and one for the model, so we do not use the renderer’s alpha blending. But we would like occlusion within the rendered 3D model.

Thanks again for your time and attention, we really appreciate this.

You can apply image flip by adjusting camera parameters. However, it may be easier to take care of 2D image flip in the image fusion algorithm.

Anyway, most of the further implementation details of implementing 3D overlay for fluoroscopy is fairly straightforward (maybe except the 2D image fusion algorithm), so there is no need to discuss them any further here.

Hi Andras, David, Sankhesh,

I was able to achieve the desired fluoroscopy perspective by combining several of your suggestions.

The solution I ended up with required a combination of two steps:

  1. Setting the camera position to the point exactly opposite of the focal point, as seen from the camera position (i.e. rotating the camera position around the focal point 180 degrees, with the same viewUp). This gives the desired depth inverted perspective scaling, with cells of the 3D model farther away from the original camera position appearing larger than equally-sized cells closer to the camera.
  2. Inverting the sign of both the X- and the Z-values in the camera’s projection transform by setting the Camera’s UserTransform matrix to an identity matrix, with -1 on both the X and Z:
    -1 0 0 0
    0 1 0 0
    0 0 -1 0
    0 0 0 1
    Inverting the sign of X corrects for the Left-Right flip that results from rotating the camera around the focal point.
    Inverting the sign of Z places the cells cells in the back our 3D model on the front and vice versa. This corrects for the Front-Back flip that results from rotating the camera around the focal point.

Thanks a lot for helping me out.

1 Like