Good day,
OS: Windows 10 using VS2019 (C++)
after changing from VTK 8.2 to 9.0.1 none of the examples run anymore. I compiled the cone6 example but it immediately returns from the vtkRenderWindowInteractor::Start() function.
With an older own code previously running perfect on VTK8.2 I know, after calling vtkRenderWindowInteractor::New() the output window shows
Hi Paulo, Andrew,
many thanks for your quick reply. Unfortunately both of your suggestions doesn’t work. I believe I made something wrong with my project files definition. I tried the procedure with cmake as decribed on the tutorial page but not successfull. Have created a new initial VS project and setup pathes accordingly. It compiles fine (in debug mode only) but when I step into this->StartEventLoop(); it does nothing and immediately returns. I changed the interactor form vtkRenderWindowInteractor to vtkWin32RenderWindowInteractor and it is processing in a loop but I can only see the command window but not the render window with the cone.
I becomes somewhat complicated for me and without an easy to use running sample I am unable to figure out how it may work. I think I return back to version 8.2 or try to find another 3D graphics library. I like the possiblities of the vtk class library but for a 3D novice like me it’s to complicated.
Which you a happy X- Mas and a (better than 2020) New Year!
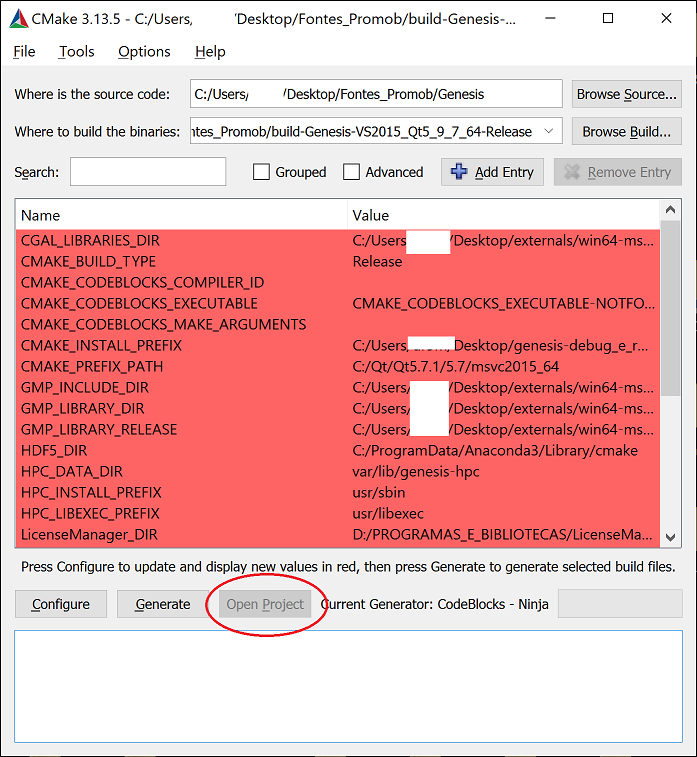
If you’re trying the cone example without modification, I suggest you to click on the “Open Project” button in CMake window instead of trying to create a new project. That button opens the VS solution generated by CMake without any issues. Once you get acquainted with it, you may start modifying it.
Hello Paulo,
after playing around now I know how to get the examples compile and run. Many thanks for your suggestions.
With the runnoimng example I was able to create an own visualstudio *.props file which I am using as the parent setting in my own projects.
I like to take the opportunity here to pint out that I had some difficulties to get my openGL classes to run. Finally I found the reason by examiniation of the example which includes the preporocessor macros:
vtkRenderingContext2D_AUTOINIT_INCLUDE=“H:/CW/vtksample/XYPlot/build/CMakeFiles/vtkModuleAutoInit_04d683062bbc5774e34e8c62b13e1a5a.h”
vtkRenderingCore_AUTOINIT_INCLUDE=“H:/CW/vtksample/XYPlot/build/CMakeFiles/vtkModuleAutoInit_04d683062bbc5774e34e8c62b13e1a5a.h”
vtkRenderingOpenGL2_AUTOINIT_INCLUDE=“H:/CW/vtksample/XYPlot/build/CMakeFiles/vtkModuleAutoInit_04d683062bbc5774e34e8c62b13e1a5a.h”
After examination of the header files I created an own with the following content which I use as the very first include in my projects. I found if it is included later, after including certain vtk header files, it may not work properly since the macros may be needed early during compile time. I suggest to mention this circumstances in the documentation at a prominent location:
I use this in my .cpp's to properly initialize certain VTK modules:
#include <vtkAutoInit.h>
VTK_MODULE_INIT(vtkRenderingOpenGL2) // VTK was built with vtkRenderingOpenGL2
VTK_MODULE_INIT(vtkInteractionStyle)
VTK_MODULE_INIT(vtkRenderingFreeType)
Maybe you need just the first VTK_MODULE_INIT for your case.
If you prefer the command prompt, it is recommended to use one of the prompts that come with Visual Studio which configure the environment so the dev tools work correctly. This is especially important if you have multiple versions of Visual Studio in the same machine. These prompts have names like VS2015 x64 Native Tools Command Prompt.